This page is dedicated to cardboard boomerangs.
I will try to explain you how to make your own cardboard boomerang.
We are going to work in three steps. You can easily skip the first one but I present it because it was my first step into making cardboard boomerangs.
To throw your boomerang hold it horizontal on your hand.
Aim about 10° above the horizon.
snap your finger on one wing.
One of my favourite hobbies appart from boomerang is origami (paper folding). Once I discovered plans to make an origami boomerang out of one sheet of paper.
The boomerang has to be thrown differently than normal ones. Just chek at the picture on the right.
On the first throw, the boomerang landed on my feet. But after a few tuning -positive angle, I was able to catch it after a wonderful 2m range flight.
Once I had mastered my paper boomerang, I thought that I could extend the range using cardboard as it is a little heavier than paper, so I began to make cardboard boomerangs.

cereal and bank note booms
After the origami boomerang I tried to build exactly the same shape out of cardboard to see how it behaved.It did exactly the same.
The material I used was cereal boxes as it is quite thin and easily tunable, though you have to go really easy or the cardboard creases.
Then I decided to test different shapes. I found out that nearly everything came back :
The problem with these kind of boomerang is that they are thrown horizontaly and that they can't stand the slightest breeze. So I decided to get closer to the original models still using cardboard.
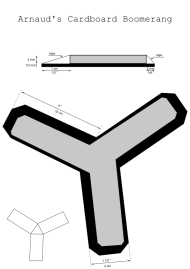
I took some heavier cardboard and built real size boomerangs. For this I cut my booms out of a calendar, this type of cardboard can also be found in folders and some pizza boxes, it is about 2mm thick.
After a few tests indoor I noticed that these models flown too far and always crached in the walls and that it was nearly impossible to throw them as I used to with previous models.
I tested my models outside and after a little tuning -always positive angle- was able to throw them as normal boomerangs and with a little layover was able to have them come back.
The thick and "heavier" cardboard booms behave like foam boomerangs you can buy about everywhere.
There is still a problem: two wings boomeramg loose their balance so easily that I have rarely been successfull with other models than tree bladders.
If you just have cereal boxes don't worry, here is a plan that I received from Tony Brazelton.
I finally had something that looked like a boomerang. Still my booms were lacking of something: I really wanted some airfoils but as I was unable to carve them, I had to find an other solution.
I found out that the best way to have an airfoil was to glue two layers together so that viewed from above, it would look like an ordinary boomerang (see the picture). As it wasn't really aerodynamic, I wrapped the layers in sticky tape (strech the tape or it will be useless) and it worked.
I built several models that were real size copies of those found at
Pierre Kutek database where you'll find lots of plans. They all worked. As these boomerang are very light and have the same airfoil as heavy boomerangs, the tuning is really the opposite of what we have done until now: no angle on the wings (or even negative angles) and negative dihedral (the boomerang should lay on its tips and elbows, not the middle of the wings). As the boomerang is very light you'll have a gentle throw and even if you don't feel the wind you'll consider there is a lot and throw vertical (or even negative angle).
All the boomerangs I have copied real size with this method worked though for some yet unknown reasons, two wings booms sometime loose their balance at the end of the flight and crach before you catch them but three bladders are excelent.
The plan you can download is for what I consider to be the easiest boom you can make with the tape airfoil. You'll notice that there are only straight lines, that is because it is a little bit difficult to strech the tape in the curves. I have this one ready in 10mn and it goes 10 to 20 meters.
There are still experiments to do with cardboard tape airfoils boomerangs: I will soon try and make LD booms and see if I can go pass 50m, I will try even lighter booms for MTA (I don't know anything about MTA tuning but have achieved 30s flights with cardboard booms). I think about inserting coins between the two layers so that I will get some more stable "breeze resistant" and longer range booms.
All I put on this page is the result of personnal experiments, if you have any comments, please feel free to , I will surely write back and try to take them into account.